Table of Contents
- 1. Introduction
- 2. Installation
- 3. The Osmium command
- 4. Showing OSM files
- 5. OSM file formats and converting between them
- 6. Verbose mode
- 7. Getting OSM objects by ID
- 8. Checking references
- 9. Creating geographic extracts
- 10. Filtering by tags
- 11. Working with history files
- 12. Working with change files
- 13. Working with changesets
- 14. Sorting OSM files
- 15. Command line completion
- 16. Common tasks
1. Introduction
Osmium is a versatile command line tool for working with OpenStreetMap data. It includes many useful functions for manipulating OSM data and often outperforms similar tools. This manual will introduce the tool, give a general overview and describe some use cases. For the nitty gritty detail consult the manual pages.
Osmium is Open Source and available under the GNU General Public License. It works and is regularly tested on Linux, macOS, and Windows.
Osmium is based on the C++ library libosmium and it gets most of its functionality from it. If the command line tool doesn’t do something you need, have a look at the library. Maybe you can use it to create a program that does what you want.
This manual is intended as an easy to read introduction. It is not complete. Please refer to the manpages for a complete reference.
2. Installation
From source
You can download the latest release or install the current master from GitHub:
git clone https://github.com/osmcode/osmium-tool
Follow the build and installation instructions in the README.
Debian and Ubuntu
Packages called osmium-tool are available for Debian and Ubuntu systems.
(Do not install the osmium package, it is a very old version of the Osmium
library.) Depending on your system, the packages might be rather old. Debian
unstable and testing are tracking the development of Osmium closely. For
Debian Stable those new packages are available in the
backports repository.
Fedora
Packages for several Fedora versions are available.
Archlinux
Packages can be installed from AUR: osmium-tool
3. The Osmium command
The starting point for everything is the osmium command. All the
functionality of Osmium is available via this one command and its
“subcommands”, similar to how the git command works for instance. Just
calling
osmium
will give you a list of subcommands. Use
osmium COMMAND -h
to get a short description about a subcommand’s options. Use
osmium help COMMAND
to display the manual page explaining all the details. If Osmium is installed
correctly on your system, you can also get those manpages using the usual man
command:
man osmium
man osmium-fileinfo
etc.
The manpages are also available on the web.
4. Showing OSM files
Before you can do anything with an OSM file you’ll often want to know what’s in that file. To find out run
osmium fileinfo OSMFILE
Say you downloaded an extract of the tiny country of Liechtenstein (it is always good to start your experiments with a small extract) from Geofabrik and want to know what’s in it:
osmium fileinfo liechtenstein-latest.osm.pbf
This will show you something like the following:
File:
  Name: liechtenstein-latest.osm.pbf
  Format: PBF
  Compression: none
  Size: 2397841
Header:
  Bounding boxes:
      (9.471078,47.04774,9.636217,47.27128)
  With history: no
  Options:
    generator=osmium/1.8.0
    osmosis_replication_base_url=http://download.geofabrik.de/europe/liechtenstein-updates
    osmosis_replication_sequence_number=2866
    osmosis_replication_timestamp=2021-01-29T21:41:04Z
    pbf_dense_nodes=true
    timestamp=2021-01-29T21:41:04Z
The File section contains the information gleaned from the file system,
the Header section contains, as the name implies, the information from the
file header. To get some more detail use the -e or --extended flag:
osmium fileinfo -e liechtenstein-latest.osm.pbf
In this case the whole file will be read, which will take more time. But it gives you a lot more information:
File:
  Name: liechtenstein-latest.osm.pbf
  Format: PBF
  Compression: none
  Size: 2397841
Header:
  Bounding boxes:
    (9.471078,47.04774,9.636217,47.27128)
  With history: no
  Options:
    generator=osmium/1.8.0
    osmosis_replication_base_url=http://download.geofabrik.de/europe/liechtenstein-updates
    osmosis_replication_sequence_number=2866
    osmosis_replication_timestamp=2021-01-29T21:41:04Z
    pbf_dense_nodes=true
    timestamp=2021-01-29T21:41:04Z
Data:
  Bounding box: (8.8331793,46.9688169,9.6717077,47.5258072)
  Timestamps:
    First: 2007-06-19T06:25:12Z
    Last: 2021-01-29T20:29:57Z
  Objects ordered (by type and id): yes
  Multiple versions of same object: no
  CRC32: not calculated (use --crc/-c to enable)
  Number of changesets: 0
  Number of nodes: 270019
  Number of ways: 27962
  Number of relations: 853
  Smallest changeset ID: 0
  Smallest node ID: 26032956
  Smallest way ID: 4781367
  Smallest relation ID: 8497
  Largest changeset ID: 0
  Largest node ID: 8376540565
  Largest way ID: 899612122
  Largest relation ID: 12192313
  Number of buffers: 402 (avg 743 objects per buffer)
  Sum of buffer sizes: 25005184 (0.025 GB)
  Sum of buffer capacities: 26345472 (0.026 GB, 95% full)
Metadata:
  All objects have following metadata attributes: version+timestamp
  Some objects have following metadata attributes: version+timestamp
Sometimes your are only interested in a specific piece of information from this
list. Use the -g, --get option to ask for it. For instance to get the last
timestamp used:
osmium fileinfo -e -g data.timestamp.last liechtenstein-latest.osm.pbf
This will result in just the timestamp:
2021-01-29T20:29:57Z
This format makes it easy to use the output in other shell commands. To put the
CRC32 checkum into the checksum shell variable you can use the following
command, for instance:
checksum=$(osmium fileinfo -e -g data.crc32 $filename)
Of course you might also want to look at the contents of the file. For a quick
look, use the show command:
osmium show liechtenstein-latest.osm.pbf
This will show the contents of the file in the debug format (more on the
different formats below) using your favourite pager (less by default):
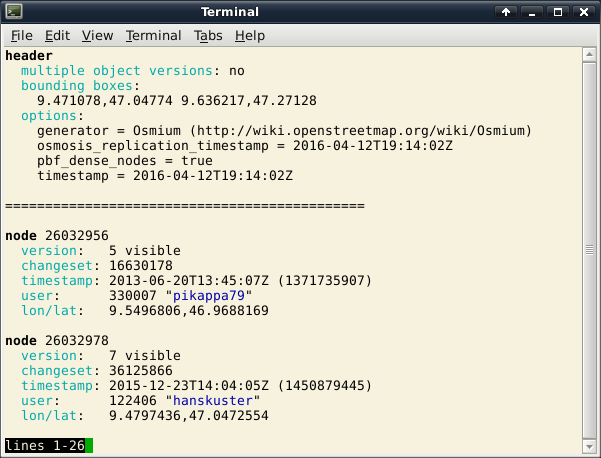
This debug format is intended to be easy to read, on terminals that support it, colors make it even easier. But you can change the output format to any format supported by Osmium.
5. OSM file formats and converting between them
Osmium supports all popular OSM file formats (and some more): XML, PBF,
O5M/O5C, OPL, and the already mentioned debug format. Some formats can
only be read or only be written. See the
osmium-file-formats
man page for details. All the text-based formats can be automatically
(de)compressed if they use the gzip or bzip2 compression.
Often you need to convert OSM data files from one format to another. This
is easily done with the osmium cat command. To convert the Liechtenstein
PBF file into XML format compressed with bzip2, use this command:
osmium cat liechtenstein-latest.osm.pbf -o liechtenstein.osm.bz2
Osmium will automatically detect the file format based on the file name.
Usually it will do what you want, but you can force the file format with
the command line options -f (for the output file) and -F for the input
file. This is useful when reading from STDIN or writing to STDOUT:
osmium cat input.osm.pbf -f osm | some_program_reading_osm_xml
The format for the -f and -F options is simply the suffix you would usually
use for an OSM file (here osm). It also works with pbf (or osm.pbf),
osm.gz etc.
Most file formats have special options to change the details of the file format. You can set those special options with the same command line options. For instance, if you want a bz2ip-compressed XML file without metadata use this:
osmium cat input.osm.pbf -o output.osm.bz2 -f osm.bz2,add_metadata=false
The output file will not have the version, timestamp, etc. fields and so
it is much more compact than the usual XML format.
As you can see, you can add the options to the format separated by commas,
multiple options are possible. Some options are available for several or all
formats (add_metadata for instance), others are specific to one of the
formats, pbf_dense_nodes for instance only works on the PBF format. Note
that unknown options are silently ignored, so if you mistype an option, you
will not get an error message!
See the osmium-file-formats man page for all the details. Btw: all these file formats and options are implemented in the libosmium library, so most libosmium-based programs will understand them in the same fashion.
While playing around with the command you might have noticed an error
message like Open failed for 'output.osm.bz2': File exists. By default
Osmium will not overwrite an existing file. This is a safety measure to
keep you from accidentally deleting that 60GB planet file, that took you
all day to download. With the -O or --overwrite option you can disable
this check.
The osmium cat command can do more: Just like the shell cat command, it
can take several input files and it will concatenate them to generate the
output. In fact that’s where the name (con”cat”enate) comes from. Its ability
to convert from one file format to another is only a side-effect really, most
Osmium subcommands can read and write OSM files in any format and support the
same -f and -F options. Note that this command will really just
concatenate its inputs and not sort them in any way. This might or might not
be what you want.
There is one additional option of the osmium cat command that often comes
handy. With -t TYPE it can be instructed to only copy objects of the given
type. So
osmium cat input.osm.pbf -t node -o output.osm.pbf
will only copy the nodes, not the ways, or relations.
6. Verbose mode
Most Osmium commands support the -v or --verbose command line option to
enable verbose mode. Osmium will then display information about its command
line parameters and about what it is doing to STDERR.
Each line of the output is started with the elapsed time in minutes and seconds. This is especially useful when Osmium is run in scripts and the output is logged, you can immediately see where the time went.
In verbose mode, most Osmium commands will also display the memory used. This
is handy because Osmium command often need a lot of memory to efficiently do
their job. There is also a MEMORY section in each of the man pages that
tells you about memory use of this particular command.
7. Getting OSM objects by ID
Sometimes you have the ID of a node, way or relation (or a bunch of IDs) and
want to get the objects with those IDs from a file. That’s what the getid
command is for. The following command will get the nodes 17 and 18, the way
42, and the relation 3 out of the file:
osmium getid input.osm.pbf n17 n18 w42 r3 -o output.osm.pbf
As you can see the IDs are written with a one-letter prefix denoting the type.
IDs without this prefix are understood to be node IDs (but this can be changed
with the --default-type option).
If you have more than a few IDs you can put them into a file, one ID per line
and use the -i option to read them from that file:
osmium getid input.osm.pbf -i ids -o output.osm.pbf
Empty lines and everything after a space or hash (#) sign is ignored. And you can read from STDIN. So this command
echo "r123 foo bar" | osmium getid input.osm.pbf -i - -f debug
will find the relation with the ID 123 in input.osm.pbf and output it to
STDOUT in debug format.
Often you need not only the OSM objects with the given IDs but also all
objects referenced by those objects. So for ways you need the nodes in it
and for relations the members. Use the -r or --add-referenced option to
add them to the output:
osmium getid -r input.osm.pbf w222 -o output.osm.pbf
The output will contain first all nodes references by way 222 and then the
way. The getid command will read the input file up to three times to
follow all the references. Output will be sorted in the usual fashion: first
nodes ordered by ID, then ways, then relations.
8. Checking references
A full planet dump is referentially complete. All objects referenced by other objects are in the file. So if a relation has a member way 123, then this way will also be in the file. This is not always true for geographical extracts or other partial OSM files.
This often leads to confusion. Many programs that use OSM data will fail
in unexpected ways when something is missing in its input data. If you have
a situation like this you can use the check-refs command to find out whether
your OSM file is referentially complete:
osmium check-refs input.osm.pbf
This command will check that all nodes referenced in the ways are in the input
file. If you want to check relation members, too, use the -r or
--check-relations option.
9. Creating geographic extracts
There is often the need to create a geographical extract of OSM data that only contains the data for a specific region. Instead of working with the huge amount of data for the whole planet, further work can then be done with much less data.
Creating an extract
Osmium can create such an extract with the osmium extract command. Here is a
simple example that will cut (from the file called france.pbf) everything
inside the given bounding box, in this case the city of Paris roughly inside
the ring road and write it out into the file paris.pbf:
osmium extract -b 2.25,48.81,2.42,48.91 france.pbf -o paris.pbf
If you happen to have a polygon describing Paris, you can use it instead:
osmium extract -p paris-polygon.geojson france.pbf -o paris.pbf
This assumes you have the polygon in GeoJSON format in
the file paris-polygon.geojson. Osmium also understands the POLY
format,
a text-based format popularized first by Osmosis and sometimes used in the OSM
world to specify such polygons:
osmium extract -p paris-polygon.poly france.pbf -o paris.pbf
Osmium can also read an OSM file with a (multi)polygon in it that specifies the area to cut out. If you know the relation ID of such a multipolygon, you can download it from the OSM server using a URL such as this:
https://www.openstreetmap.org/api/0.6/relation/RELATION-ID/full
For Paris this could be
https://www.openstreetmap.org/api/0.6/relation/7444/full
(This will not always work, see below on how to fix this.)
This works well for smaller multipolygons (such as city boundaries), but for very large multipolygons (such as a whole country) chances are you’ll get a timeout from the API. If you have an OSM file lying around that contains the boundary, you can use osmium to get the relation and all the nodes and ways used in that relation:
osmium getid -r -t france.pbf r7444 -o paris-boundary.osm
The options are important here: -r makes sure you get all the members of
the relation and all the nodes in the member ways. -t removes the tags from
all objects except the relation 7444 itself. This way only the relation itself
is turned into a (multi)polygon and not other relations or closed ways that
happen to be in the data.
(If you have problems with relations downloaded from the API, the solution
is the same. Run the mentioned osmium getid command on them.)
And now you can create the extract:
osmium extract -p paris-boundary.osm france.pbf -o paris.pbf
Creating multiple extracts in one go
Often you want to create several extracts from the same source, say one extract for each département (administrative division) in France. For the 101 départments in France, this would mean you have to read the input file that many times. Fortunately there is another way: You can specify the extracts you want to create in a config file and then osmium can do all extracts in one go:
osmium extract -c departments.json france.pbf
Note that this time no output file was named on the command line. Instead the
output file names are specified in the config file. The config file (here
departments.json) is in JSON format and looks something like this:
{
    "directory": "/tmp/",
    "extracts": [
        {
            "output": "dep01-ain.osm.pbf",
            "polygon": {
                "file_name": "dep01-ain.geojson",
                "file_type": "geojson"
            }
        },
        {
            "output": "dep02-aisne.osm.pbf",
            "polygon": {
                "file_name": "dep02-aisne.geojson",
                "file_type": "geojson"
            }
        },
        ...
    ]
}
The directory names the common output directory (use --directory or -d
on the command line to overwrite this). And each member of the extracts
array specifies one extract to create. Just as on the command line you can
specify the extract by bounding box or polygon (using any of the supported
file formats). There are several ways to specify all the details. See the
osmium-extract(1) man
page and the
example
config
for the details.
Extract strategies
Osmium offers three different strategies governing how the extract should be created. Their results are different, more or less OSM objects will be included in the output. They also differ in memory consumption and how often they will read the input file.
Strategy: simple

When using the simple strategy, all nodes inside the specified region are included and all nodes that are outside the region are not included. All ways that have at least one node inside the region are included, but they might be missing some nodes, they are not reference-complete. Only relations that have a node or way that is already in the extract are included. Relations are not reference-complete.
For the simple strategy the input file is only read once. This is the only strategy that will work if the input is read from STDIN or the output written to stdout.
Strategy: complete_ways

When using the complete_ways strategy, all nodes inside the specified region as well as all nodes used by ways that are partially inside the specified region will be in the output. All ways in the output will always be reference-complete (if they were reference-complete in the input). So in the example image the red, green, and cyan ways will be in the output with all their nodes. The blue way is not in the output, because none of its nodes is in the region, even though the beginning and end nodes will be in the output. All relations that have any already included nodes or ways are in the output as well as any of their parent relations and so on. Relations are not reference-complete.
For the complete_ways strategy the input file is read twice.
For the complete_ways strategy is the only strategy that can be used on
history files, too. You have to add the --with-history option for this to
work. All objects that have at least one version in the output, will be in
the output with all their versions. So if a node moved from inside the region
to outside, all versions of this node will be in the output as well as all
ways referencing this node and so on.
Strategy: smart

When using the smart strategy, everything is done as in the complete_ways strategy, but multipolygon relations that have at least one node in the region will also be completely included. You can see this in the example image: If a multipolygon relation ties the red, green, and blue ways together, the blue way and all its nodes will be included.
By default this only works for relations tagged type=multipolygon, because
this is what is needed most often. A lake or forest crossing the boundary of
your region will be in the extract completely. But a boundary for instance
will not be, otherwise you might get a huge boundary around a whole country in
your extract when all you wanted was a small area at the border. You can change
this behaviour with the -S or --option option. If you want all relation
types, use -S types=any, if you only want particular types, specify them like
this: -S types=multipolygon,route.
For the smart strategy the input file is read three times.
Performance and memory use
If you are trying to cut out all 101 départments from France, you’ll most
likely run into difficulties, because this will need a huge amount of memory.
Osmium has to keep track of all the IDs of all nodes, ways, and relations it
needs for each extract. It depends on the strategy used, but you’ll need
between 1 and 2 GByte RAM for each extract. You can solve this by running
osmium extract several times, each time cutting out smaller and smaller
areas. In our example here it might make sense to extract in a first round
each of the regions of France and then have one round per region cutting it
into the smaller départments.
There is a (small) difference in the performance between cutting out by bounding box and by polygon. It is fastest to extract using a bounding box, for polygons the performance depends on how detailed the polygon is. But unlike some other tools that don’t work well with very detailed polygons, this has only a relatively small effect in Osmium. But if you want to do your extracts often, check the performance of different strategies and region specifications and find out what works best for you.
10. Filtering by tags
We are often interested in only a subset of the OSM data, maybe only the roads (if we want to do navigation on them), or all restaurants, or everything that is some kind of forest.
Osmium supports this through the tags-filter command. For example to get
everything in Rome that’s a road, you could use something like:
osmium tags-filter rome.osm.pbf w/highway \
    -o highways-in-rome.osm.pbf
The w/highway tells Osmium that we are looking for all ways that have a tag
with key highway. If we want to look for more specific road types, we can
do that, too, with something like w/highway=primary. Finding all the primary
roads would look like this:
osmium tags-filter rome.osm.pbf w/highway=primary \
    -o highways-in-rome.osm.pbf
You can filter by several expressions at the same time, so finding everything that’s tagged as some kind of wooded area is easy:
osmium tags-filter park.osm.pbf wr/natural=wood wr/landuse=forest \
    -o wooded-areas.osm.pbf
The first positional parameter after tags-filter is always an OSM file, all
the following ones are filter expressions. Filter expressions start with the
type or types of objects we want to filter (n for nodes, w for ways, and
r for relations) and than something describing the key and optionally the
value of a tag. So this will find all nodes tagged as restaurant:
n/amenity=restaurant
But POIs can also be mapped as area, so we really have to look for the ways and relations, too:
nwr/amenity=restaurant
This can be shortend to just
amenity=restaurant
Also allowed are lists of values:
w/highway=motorway,trunk,primary
This also works in keys:
n/name,name:en=London
Or you can exclude a specific value:
r/type!=multipolygon,route
This will find all relations that have a type key with a value that’s not
multipolygon and not route.
An asterisk at the end signals that this should be a prefix check. Everything
with a tag starting with addr: can be found this way:
n/addr:*
An asterisk at the beginning turns this into a substring search:
nw/name=*school
will find any nodes or ways that have the word school in their name. Osmium
always uses a case-sensitive search, so you might have to use something like
this to get everything:
nw/name=*school nw/name=*School
Note that in all these cases you will get the full objects back. Osmium is not removing tags from objects, it is only filtering complete objects from the input based on those tags.
Osmium will automatically add all nodes referenced by the ways it found and all
members referenced by the relations it found. If you don’t want this, you can
use the --omit-referenced or -R option. So
osmium tags-filter rome.osm.pbf -R name=Via* \
    -o via.osm.pbf
will find only the ways named with something starting with Via, but will not
include the nodes needed to draw those ways on a map.
Sometimes it is useful to filter the other way around. Let’s say you want to
work with some OSM data, but don’t know yet what tags you need exactly. But
you do know that you are definitely not interested in buildings. Then you can
use the --invert-match or -i option to invert the sense of your match:
osmium tags-filter -i city.osm.pbf wr/building \
    -o no-buildings.osm.pbf
As always, you can find all the details in the man page
11. Working with history files
Osmium can not only work with normal OSM data files, but also with history files. History files look more or less like normal OSM data files, but they can contain several versions of the same object. The full history planet dump contains all versions of all objects that ever existed in the OSM data.
Most programs using OSM data expect object IDs to be unique, so they can not work with history data. The same is true for some Osmium subcommands. But wherever it is possible and makes sense, Osmium also supports history files. Often they will just work, sometimes you need special command line options.
Commands that “just work” are cat, fileinfo, show, sort. They will do
what you expect. The apply-changes and extract commands have an option
--with-history that makes them work with history files.
One command is only useful for history files: time-filter. It is used to
filter objects from a history file based on time. To get all objects visible
at a point in time use a command line like this:
osmium time-filter history.osm.pbf 2015-01-01T00:00:00Z -o 2015.osm.pbf
The output is a normal OSM data file containing the data as it would have looked at the start of the year 2015 (UTC time as always with OSM).
12. Working with change files
While OSM data files contain the OSM data of a specific point in time and
OSM history files contain all the data that is now and ever was in the data,
an OSM change file contains the data that changed between two points in
time. Those change files (usually with the suffix .osc or .osc.gz or
.osc.bz2) can be used to update an OSM file or OSM database from an earlier
state to a later state.
Osmium has commands to deal with those change files. Most often you will use
the apply-changes command which applies one or more change files to a data
file:
osmium apply-changes planet.osm.pbf change-123.osc.gz change-124.osc.gz \
    -o planet-new.osm.pbf
You can give as many change files as you want on the command line and in any order. All changes will be read into memory and sorted before they are applied to the data file. If you have a lot of change files, it might be better to apply them one bunch at a time so this will not use too much memory.
The same command also works with history files:
osmium apply-changes australia.osh.pbf australia-changes.osc.bz2 \
    -o australia-new.osh.pbf
Note the .osh file suffix which tells Osmium that you want your history file
updated. Sometimes history files are named .osm. In this case you can force
history mode with a command line option:
osmium apply-changes australia.osh.pbf australia-changes.osc.bz2 \
    --with-history -o australia-new.osh.pbf
Sometimes you don’t want to apply changes to an OSM file, but to a database
or so. For instance when you are upgrading a osm2pgsql rendering database.
If you have a lot of change files, it is often better to merge them into one
larger change file and then use that one to do the database import. Merging is
done with
osmium merge-changes --simplify ch456.osc.gz ch457.osc.gz \
    -o merged-changes.osc.gz
The --simplify option usually makes sense: If an object changed multiple
times, all intermediate versions will be removed and only the last version
remains.
Osmium can also do the reverse: Create a change file from two OSM data files.
This is done with derive-changes:
osmium derive-changes yesterday.osm.pbf today.osm.pbf \
    -o changes-since-yesterday.osc
There is another command that, on the surface, appears to be similar to
derive-changes but serves a totally different purpose, the diff command.
The diff commands allow you to see the difference between any two OSM files
in various formats. It compares all details of all OSM objects, so it will,
for instance, detect if there is an object with the same type, id, and version,
but different timestamp. This is different from the derive-changes command
which will only look at the object type, id, and version to do its work.
The difference in behaviour comes from the different intended uses. The
derive-changes command is only used to, well, derive a change file from
two OSM files. Those OSM files must be snapshots of the OSM database or some
extracts from different points in time. The diff command, on the other hand,
can be used to check any two OSM files. This is useful for instance for
developers who want to compare the output of two different versions of the
same program creating some kind of OSM file.
13. Working with changesets
Osmium can not only handle OSM objects (nodes, ways, and relations), but also
OSM changesets. Those changesets are also stored in files with the suffix
.osm, which can make things somewhat confusing. Some Osmium commands will
just work on changeset files: osmium fileinfo, osmium show, and
osmium cat. Others don’t make any sense with changeset files, like
apply-changes.
Unlike OSM data files for which several formats are available (XML, PBF, O5M, …) changesets always come in XML format which is much slower to work with than the binary formats.
There is one command specifically for changeset files: changeset-filter.
You can use it to select changesets from a file. If you want to get all
changesets by user “Einstein”, for instance, you’d use this command:
osmium changeset-filter -u Einstein changesets.osm.bz2 -o einstein.osm.bz2
Have a look in the man page to see the other options available. You can also combine several of them to only get those changesets matching all criteria.
Changesets can also be written out into the OPL format which can be processed
easily with standard unix command line tools. Say you have a list of user names
and want to find all changesets in January 2015 by any of those users. You can
first use changeset-filter to filter out the time window and then use grep
to check for those users:
osmium changeset-filter -a 2015-01-01T00:00:00Z -b 2015-01-31T23:59:59Z \
    -f opl | grep ' u\(foo\|bar\|baz\) '
This way you can use the fast, but not very flexible filtering options of the
changeset-filter command together with slower, but more flexible filtering
using unix command line tools or scripting languages.
14. Sorting OSM files
OSM files are usually sorted in a specific way: First the nodes ordered by
ID, then ways ordered by ID, then relations ordered by ID. But this is not
necessarily so. osmium fileinfo will tell you if a file is sorted or not:
> osmium fileinfo -e input.osm.pbf
...
Objects ordered (by type and id): yes
...
Many commands (Osmium or otherwise) only work correctly if the file is sorted. Sorting a file is easy:
osmium sort input.osm.pbf -o output.osm.pbf
Note that osmium sort reads the contents of the input file into main memory.
This will take roughly 10 times as much memory as the files take on disk in
.osm.bz2 or osm.pbf format. So this command is only useful for smaller OSM
files. See the --strategy option in the man
page for a way of
saving some memory.
Osmium sort will work correctly on history and change files.
15. Command line completion
There is a command line completion configuration available for Zsh users. This
allows comfortable command line completion of all Osmium commands including
command line options. If you have installed Osmium as a Debian package, it
will be installed for you. If you built and installed from sources, you need
to install the file zsh_completion/_osmium yourself, for instance in
/usr/local/share/zsh/site-functions/.
16. Common tasks
This chapter explains how to solve some common tasks with Osmium.
Filtering by tags in history files
The osmium tags-filter command works well with normal OSM files, but it
probably will not do what you want with history files.
If you want to get all versions of all nodes where at least one version has
a specific tag, you can use tags-filter together with getid to do this:
osmium tags-filter input.osh.pbf n/shop -o out.osh.pbf
osmium getid --id-osm-file out.osh.pbf --with-history input.osh.pbf -o filtered.osh.pbf
The file filtered.osh.pbf now contains the result, you can use time-filter
to get the data for specific points in time:
osmium time-filter filtered.osh.pbf 2018-03-01T00:00:00Z -o result.osm.pbf
If you want to filter not only nodes, but ways or relations, you’ll need to
use the --add-referenced option on the getid command.